Friday, April 23, 2010

Tutorial on My Birthday Look

I know my birthday is sooooo yesterday. But then I remember that I haven't show you the close up of the look I did. So, I decided to do a tutorial as well. 

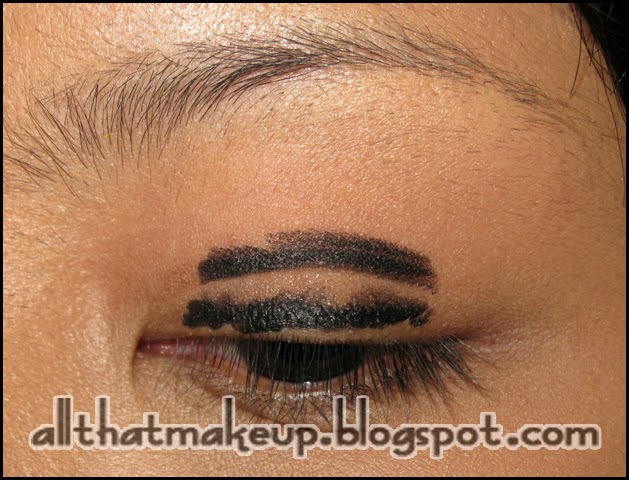
First, I'm gonna need a black base. I use Stila Kajal Liner in 'Onyx'. Apply it on my lid and then blend it. By the way, boyfriend walked in when I was doing this step and he was, like, "Whoa! Is that because we're going to a jail-themed restaurant?!" LOL! 


This is how it looks like after you blend it. Take a little bit of it and blend it upward to the crease


Next, I apply Urban Decay Deluxe eye shadow in 'Underground' on top of 'Onyx'


Apply crease color, which is Urban Decay Deluxe eye shadow in 'Honey'


MAC 'Carbon for the outer corner


Drag 'Carbon' to the outer half of the lower lash line


Don't forget to add eye liner on your upper lash line and lower tight line


And the final look...


Sunday, April 18, 2010

[Review] My HG Foundation Brush

Happy Sunday, everyone! How’s your Sunday doing? It’s a lazy Sunday for me. I have to wake up early for six days a week, Sunday is my only sweet escape. Nothing beats snuggling up under my bed cover and sleep until noon. Anyhow, I didn’t sleep till noon. I slept at eleven last night and woke up at nine this morning. Now that’s one long beauty sleep.

Okay, sorry for rambling on and on. Let’s just continue to my review.

Have you found your foundation brush yet? I mean like, your HG one? I tried a stippling brush before. And I’m not a fan. It was okay, but not great. I think the pixelated bristles that suppose to give that ‘airbrushed’ look make foundation application feels never ending. When I do my make up using the stippling brush, I’m always the last one who gets out of the house along with mom’s voice yelling at me to hurry up! Plus, I don’t see any airbrushed look whatsoever.

As for paddle brush, still not a fan. Back when I had only stippling brush and paddle brush, I always reached for paddle brush. It’s denser than stippling brush so at least I could apply my foundation faster. But it makes my foundation kinda streaky. So I have to, either make short strokes or, go back to back to the part I’ve applied my foundation on, and fix it.

The first time I laid my eyes on Stila Double Duty Cheek and Contour Brush, in my heart I KNEW that this will be a great match for my foundation. It was like…. Magic (yes, I’m quoting Sleepless in Seattle, in case you’re wondering. I’ve watched the movie for like a gazillion times). I mean, look at the dense bristles, I bet that’ll help spread my foundation in no time.


You’re probably wondering about the name. But you know what Shakespeare said, "What's in a name? That which we call a rose; By any other name would smell as sweet." According to Sephora, “A corner edge applies color precisely beneath the cheekbone for a contoured cheek look. The flat circular top of the brush puts cheek color down on top of the cheekbone in one sweep.”

After contemplating for some times, I finally decided to purchase this brush at Sephora Hong Kong. And no regret! As I thought, I love how dense the bristles are. The brush helps transfer my foundation on my face with just the tiniest amount of it. When I use this brush, I love to pat the foundation in a quick motion, instead of swirling it, to give me that full coverage. The bristles of the brush are at the perfect length. They don’t bent on your skin and gives you more control. The bristles do shed a little the first time I washed it (I always wash brushes I just bought, before I use it). But that’s it.

Other than liquid and powder foundation, this brush also great for applying loose or compact powder (although I rarely use powder these days) and I use this for my mineral make up. This brush is multitasking when it comes to complexion!

As for what this brush is intended to, blush brush and contouring, I find the top of the brush is way too big for my cheeks. It smeared color all over the places I need no blush on. And do you know how hard it is to contour using the edge of a flat top brush? That being said, I’m gonna skip this brush when it comes to applying blushes and contouring.

The only downside of this brush, I think, that this is so overpriced. This brush sells for US$45. I bought it for HK$420 (times Rp1200), considering that this is a China made brush. I really have to save up to buy this.

But still, I’m glad I have this brush. It’s my one and only foundation brush now.


Wednesday, April 7, 2010

[Review] Viva Eyebrow Pencil

I can't believe I've been using this eyebrow pencil for all this time and haven't even reviewed it yet. I'm talking about my Viva eyebrow pencil. As you can probably tell, I use this in all of my FOTDs, since I started wearing eyebrow pencil. Which is quite recent.


Viva is an Indonesian make up and skincare line. And Viva eyebrow pencil is something most make up artists would recommend. This eyebrow pencil comes in two shades, black and brown. I bought mine in brown, since my eyebrows are pretty thick already, black eyebrow pencil will look to harsh on my face.

Now let's sing my praises about this pencil. I've been using it for quite a while and I really love the consistency of this pencil. It's soft, so it won't hurt your skin but not that soft so you won't transfer too much color and you don't have to sharpened it too often. So even the pencil is kinda skinny, still, it'll last for a long time. The staying power is great and it's waterproof too. With all of those quality, this pencil sell for only Rp13000 (the last time I bought it, around last year). It's about $2, convert it to USD. Seriously in love with this pencil!

Talking about the packaging, it's a tacky orange colored pencil. Honestly it looks kinda cheap (well, it is). But I don't really mind that as long as this pencil doing a good job coloring my eyebrows. But one thing I really hate about this pencil, you can't easily get this in random department stores or super markets. If I wanna restock, I have to go to these small make up stores in traditional markets. A place I really hate to go to.

But other than that, I have no complaint. Quality wise, this eyebrow pencil is great. I know there are lots of expensive high quality eyebrow pencils out there, but what's the point of buying the expensive one if the cheap one could give the same result.

Here are the swatches of the pencil in brown.


So if you live in Indonesia and you haven't have this eyebrow pencil. Seriously, go ahead and get one. Careful with the fake ones, though (yes, there are fake Viva eyebrow pencil in the market, that's what I read).

Hope this review helps. I really should write more reviews about Indonesia brands. We have lots of great stuff here!

Sunday, April 4, 2010

Happy Easter, People..

Happy Easter everyone. How do you celebrate your Easter? This is my first Easter where I don't have anyone around.Boyfriend just got back to Jakarta. So I went to church all alone. Sad, me.

Just to remind you, this is going to be a totally random post. I have nothing to do around the house, so I turned on my computer and start twittering, blogging, youtubing and all that jazz.

Here's my today's look. Just a simple look to go to church. I don't wanna wear too heavy make up, so I ditched my foundation today. Oh! And finally I got a chance to take pictures under natural lighting. I took this picture in my car, on my way to church while waiting for the traffic light. 


I put on my Revlon Colorstay Concealer in Medium on my under eyes for this look. No matter how simple my make up is, concealer is always a must for me. If you have my under eye circles, you'll understand why. And then I applied Everyday Mineral Semi Matte Base in Olive Medium. It's light to medium coverage, you can still see my blemishes here and there, but that's the point. The mineral base evens out my skintone without making it looks masky. It looks more natural. I used MAC Mineralized Blush in Fab-Dabulous for this look. 

For my eyes, I applied Urban Decay Primer Potion first even though I'm not gonna wear eyeshadows. But applying eye primer helps reduce oil on your lids. That way, your eyeliner will stay put. I don't bother wearing primer when I have no eyeliner on. I still wanted to make my eyes stand out, so I lined my upper tight lines and lash lines with my Make Up Forever Aqua Eyes no. 0 and then layered it with my Revlon Colorstay Liquid Liner. I winged my eyeliner because that's an easy way to drives people attention to your eyes, plus for me, it makes my eyes look wider, which I love. Then I added Stila eye shadow in Kitten to highlight my browbone and inner corner of my eyes. And of course, shaped my eye brows using my favorite, VIVA eyebrow pencil.

For a second I was thinking about putting on red lipstick and copy Dita Von Teese's look. But I didn't think I have enough confidence to wear red lipstick for everyday look. I still need some time to get used to it. So right now I'm saving my red lipstick for formal occasion only. Haha.. Anyway, I put on my NYX Round Lipstick in B52 instead.

On my way back home, I bought a new shampoo. I have seriously dry to damaged hair, due to permanent straightening. Have you ever heard about Kadus Imunal? Well, I haven't. But the sales lady gave me this when I asked her for a great shampoo to fix dry hair. I also bought two sachets of hair mask from the same brand jut to try it first. Hopefully these things really work and I'll let you know.


Another thing, I learned to shaped eyebrows. And I did it on my boyfriend's eyebrows. Yes, he went through all the plucking and survived. LOL. You can see his 'before' eyebrows on my previous entry, and here's the 'after'.


Not bad, eh? And to my surprise, he liked it! He said the eyebrows shape gives him the 'eagle eyes' look. LOL. Whatever dear, just as long as you like it. I told him to keep his eyebrows in that shape until my graduation day, so it'll look good in pictures. He said yes, but I can't really picture him going to a salon to get his eyebrows shaped. I dunno.. 

Anyway, this is the end of this entry. Told ya this is gonna be so random. LOL. Thanks for reading, by the way.

Tuesday, March 30, 2010

Happy 25th Birthday, Me!

So this post isn't gonna be the usual makeup-related post. Haha.. just wanna share one of the happiest moments in my life. 

I'm finally 25th! And here are some pictures I took on my birthday.

My birthday cake boyfriend bought me. It's mocha cake covered with mocha cream, my favorite. Just a small size since there are not many people in the house to finish this cake. 


And that's him posing with the cake.

We waited till 12 a.m strikes, blew the candles together and cut the cake.


Here's my birthday present boyfriend gave me. Cute, isn't it? 


And what my sister send me all the way from Bandung. Gosh, I'm so excited! And check out this special entry she posted on her blog. She really is the sweetest. 


Anyway, me and boyfriend were having steak dinner that night at "Alcatraz Grill". People said that it's the best steak, here in Semarang. Boyfriend ordered Rib Eye *something*. It's too sweet for my liking. As for me, I ordered Lamb *something* (okay, I don't really remember the names) and it's loaded with black pepper, and that's the only thing I felt on my tongue. Bit disappointing, honestly. We didn't take a lot pictures. I got headache halfway through dinner, most likely because too much black pepper.  


So, to make this entry a little bit more make up related, here the list of what I used on dinner.

On face:
Sana Pore Putty Original Make Up Base
Makeup Forever HD Foundation no. 128
Revlon Colorstay Concealer in 'Medium'
NARS Loose Powder in 'Beach'
MAC Mineralized Blush in 'Cheek and Cheerful'

On eyes:
UDPP
Stla Kajal Liner in 'Onyx'
Urban Decay Deluxe e/s in 'Underground'
Urban Decay Deluxe e/s in 'Honey'
MAC e/s in 'Brule'
Majolica Majorca Lash Expander Frame Plus Mascara
Viva Eyebrow Pencil
Lancome Liner Design

On Lips
Lancome Color Fever Gloss no.206 'Precious Beige' *Guess you can tell that I was running late LOL!*

Friday, March 19, 2010

Nicole Scherzinger Inspired Makeup

This is a look that is inspired by Nicole Scherzinger make up. I don't know about you, but I've always been a huge fan of her make up. Anyone know who the make up artist is? Is it Troy Jensen?

Anyway, the look that I try to recreate is from one of Pussycat Dolls earliest videos, Beep. In this video, Nicole wears neutral colors on her lid and adds colored eye liner on her lower lash line. Such a simple way to steal people's attention.


Nicole's picture is taken from here

After I applied my primer, I put on MAC 'Rubenesque' Paint Pot all over lid.

MAC 'Brule' over Rubenesque.

Urban Decay 'Underground' on crease.

Urban Decay 'Mad Hatter' (as in 'Twice Baked') on lower lid. Starting from outer two third part of the lid, blend it outward and then go up, blending it with 'Underground'. And then, apply PAC 'White Frost' to highlight browbone and tear duct area.

Apply green eyeliner on lower lashline. Here I'm using Maybelline Expert Eyes in Starry Green. And then add Urban Decay 'Graffiti' over the liner.

Add loads of eyeliner. Curl lashes, add mascara and fake lashes for dramatic effects.


And, voila!

Excuse the silly expression, but this is the only picture that has the right angle and lighting. For the face, I want to achieve that glowy complexion so I swiped a little bit of PAC loose eyeshadow in 'White Frost' on top of my cheek bone, my chin and on the bridge of my nose. MAC powder blush in 'Margin' on the apple of my cheek all the way along the cheek bones.

For lips, I can't find the right shades to matches Nicole's look. I'm looking for nude lipstick with hint of peach. I put NYX Round Lipstick 'Rea' on my lips, but it still has a littlest hint of purple so I mixed it with Revlon Superlustrous lipstick in 'Almost Nude' .

I just recently moved to Semarang. I believe I've told you that before. And I rent a house here (now, that's new). And somehow, God knows why, the owner of the house painted his house green. Seriously, it's green everywhere except for the bathroom. I think the color of the wall affects my camera, in a way it makes every pictures I took without flash appear greenish. Now tell me, is it just me, or this picture looks like it has too much green in it?

So that's my version of Nicole Scherzinger's make up. Unless I have another idea in mind, I'm thinking of wearing this look on my graduation day (which is in May).  I think Urban Decay 'Underground' isn't dark enough for this look. Still looking for the right color. Any suggestions are welcome, dears! 


Wednesday, March 17, 2010

Behold, My Early Birthday Present

Guys, please welcome my very first Book of Shadow. Yes, I finally got my hands on this latest Urban Decay Alice in Wonderland Book of Shadows.


So, I have a lot to celebrate in these first months of 2010. Well, with my graduation and my birthday is coming, I think those are enough reasons to give myself a nice present. And it's not just another birthday. It's my 25th! It's an important number, you know. That means, I'm old enough to get married! Haha..

Anyway, this book just arrived yesterday. I almost ran out of it. But I found one ready stock at Pinkymiki. I was so excited! I haven't even tried the eyeshadows. And my birthday is not until the end of the month, I thought I'm not gonna post this entry until then. But I'm just too excited, I can't wait to share the story on my blog!

For you whose already familiar with Urban Decay Book of Shadows, I'm sure you guys already know that this palette usually comes with sixteen eyeshadows, two 24/7 Glide On Eye Pencils and Primer Potion in mini size.

As for Alice in Wonderland Book of Shadows, the palette has pretty much the same material. But since this palette is made especially to celebrate the launching of Tim Burton's Alice in Wonderland movie, the eyeshadows in this palette have been renamed to match to movie theme. They said, "Our shadows are topsy-turvy in Underland... Find their real-world names here":
  • Underland (Flash)
  • Alice (Painkiller)
  • Oraculum (Baked)
  • Queen (Last Call)
  • Chessur (Chopper)
  • White Rabbit (Polyester Bride)
  • Wonderland (Maui Wowie)
  • Curioser (Grifter)
  • Muchness (X)
  • Midnight Tea Party (Midnight Cowboy Rides Again)
  • Vorpal (S&M)
  • Absolem (Homegrown)
  • Drink Me, Eat Me (Sin)
  • Mad Hatter (Twice Baked)
  • Jabberwocky (Oil Slick)

I know Urban Decay and Book of Shadows are famous for their glittery eyeshadows. Judging from what I saw, seems like Chessur, White Rabbit, Wonderland, Curioser, Midnight Tea Party and Jabberwocky have the most glitters, compare to the others. We'll see how those colors will appear on lids. Oh, and the two 24/7 Glide On Eye Pencils that included in this palette are 'Zero' and 'Flipside'.

If you watched Kandee Johnson's video about this palette and saw those cute 'Drink Me' chocolate sauce and 'Eat Me' mint pills, it kinda burst my bubbles a little bit knowing that these cute bonuses aren't included with the palette. But it doesn't matter. This palette is too cute, I forgot about those bonuses immediately. Haha..

I haven't got a chance to play with this palette, up until now. But I really can't wait.