Tuesday, February 28, 2012

[Review] Real Techniques Core Collection


Here's another review of Real Techniques brushes. This time is the Core Collection. As you can see, all the brushes included in this collection has yellow handle means these brushes are meant for base products. Inside there are four brushes and you get Buffer brush, Pointed Foundation brush, Detailer brush and Contour brush. Different than the Stippling brush, which is sold as an individual brush, brushes in this collection don't have flat base to help these brushes to stand. But that's because this collection comes with a brush case where you can properly keep all the brushes.


Buffer Brush
According to Sam, this brush is ideal for powder and mineral foundation for full coverage finish. The name of the brush is self-explanatory, it's supposed to be used to buff powder on the face. Personally, this brush is my least favorite out of the collection. I think this brush is not dense enough to buff yet it's not fluffy enough to swirl powder on my face. When I try to buff this brush to blend my powder, it makes awkward motion on my skin that feels uncomfortable. Sam and Nic have been using this brush to apply their liquid foundation so I tried that too. Still, not sold. I rarely use this brush. In fact I only used this to try it and never used it anymore. I wish I could make this brush works because I don't want to waste it, so I'm open to suggestions.


Pointed Foundation Brush
When I first saw this foundation brush included in the collection, I knew this brush is not going to work as my foundation brush. It looks tiny. And yes, it's confirmed as tiny when I received it. The thing is, I'm not a very patient person when applying foundation, especially with traditional foundation brush. I used to like MAC 190 brush and I wished there was a bigger version of the brush. Pointed foundation brush in this collection is even smaller than MAC 190.

I've been using this brush mostly to apply my undereye concealer. As well as for cream blush. And to me, those are the two tasks that this brush really masters. Especially because I have a large undereye area that needs to be covered, plus I've been doing the 'triangle' technique with my concealer that works to conceal my undereye as well as highlighting the area on top on my cheeks. And this brush covers it in no time. The pointed tip makes drawing neat lines when creating the 'triangle' as well as reaching the inner part of my eyes much easier.

However, if you are thinking about purchasing Core Collection in the hope of getting a decent foundation brush, especially if this is going to be your first foundation brush, I'd suggest you to look for other foundation brush.


Detailer Brush
Honestly, I didn't expect anything from this brush when I ordered it. But now this brush has become on of my favorites. This is like a tiny and denser version of the pointed foundation brush in this collection. Just like the name, this brush works for all kinds of detail jobs. Obviously this brush is meant mostly for precise application of concealer but I prefer using this brush to smudge eyeshadow or eyeliner on my lower lashline. I also use it to line white liner all around my eyebrows and blends it. Sometimes I even use it to create a crisp 'outer V' for my eyeshadow application. This brush can also be used to blend lip liner or apply white liner all around you lips. But I decided to keep this brush for eye application only, because using it for eye and lips at the same time sounds like an unsanitary idea.


Contour Brush
Here's the brush that I'm excited the most. I've been looking for a tapered dome shaped brush for proper contouring and highlighting. And this brush does the job very well. This brush rules the cheek areas. I love how this brush has perfect density. It's sturdy enough for contouring yet feels soft when touches my skin. I use the tip to contour the area underneath my cheekbone. This brush is even perfect to create crisp line for heavy contour. I use the side of the brush for highlighting. Sometimes I use this to apply my powder blush as well although this is not really my favorite for that because I prefer fluffier brush for blush. But if you are all about multitasking brush, then this brush is good enough.


Panoramic Brush Case
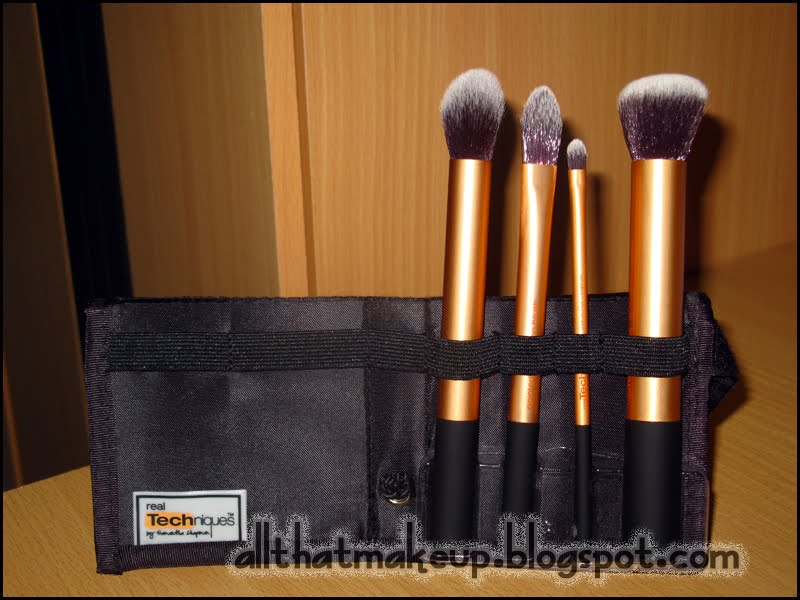
The idea of including a brush case, in my opinion, is brilliant. It's convenient for proper storage while keeping the brushes together. The brush case even comes with extra space so you can also keep other brushes altogether in this case. By pulling the toggle, the case transforms into a brush stand that you can use to display the brushes. Since the rubber material that holds the brushes are pretty tight, I use it to holds my brushes upside down when drying them.

The brush case is sealed with velcro flaps so the brushes are securely stored which also makes it suitable for traveling.

Despite the hits and misses, this collection as a whole is enough to cover all basic makeup needs. When you're on the go, with this collection, at least you already have brushes for your foundation, powder, concealer and blush. You just need to add some eye brushes if you wear eyeshadows a lot. Again, Samantha Chapman is doing a great job with her brush collection!

If you are interested, Real Techniques Core Collection is available for $17.99

Top 10 Makeup Products

This summary is not available. Please click here to view the post.

Sunday, February 26, 2012

Top 5 Favorites Youtube Beauty Gurus

Like most of people here who are addicted to makeup, I started learn about makeup through youtube. Years ago, I subscribed to many many beauty gurus and watched all of their videos religiously. I believe we are all familiar with big names like Michelle Phan, Elle and Blaire Fowler, Aubrey and all. It was fun to watch those girls not only for the tutorial but also the personality that they brought into the screen. And it's really amazing how youtube changes these girls' life. Anyway, those are the days when I was just a young girl (hey! I was in my early twenty back then) and looking for someone whose makeup skill I could easily follow. And how fun the video and the guru really is an important point for me.

Nowadays, I'm still into youtube. But as grow umm.. mature and now that I'm no longer in beginner state (Not bragging, but I think it's important to know your own level. Plus, you should see some of my first posts.), I found my interest changed. I think, the girls I first subscribed to are way too commercial now, and they're now presenting themselves more as a brand. And it's less about the makeup. Which is not wrong. It's the opportunity they got from youtube and it'd be stupid to waste it. But I also have my own need.

So here's a list of my current TOP 5 Favorite Youtube Beauty Gurus, not in particular order.


A channel runs by two sisters Samantha and Nicola Chapman. If I remember correctly they were MAC makeup artist. And both are very skillful and talented. They occasionally upload videos about makeup basic, but most of their videos are makeup tutorial. Celebrity makeup inspired, to be exact.


Runs by Wayne Goss. Oh yes, a male beauty guru. Wayne's videos are mostly about techniques. Kind of remind me of Enkore only more advance. Another thing I love about Wayne is the fact that he's not too commercial. And uses many brands that you won't find in Sephora. I heard about brand like Graftobian, Kett, Mehron and such from him. And he's not so easily impressed. So he's not gonna recommend a product just because it's highly raved. Another superficial reason? The wink! Oh, the wink!


Rae's channel really suits me. Why? Simple. You can tell from the name of the channel. Rachel does reviews. A lot. A thorough, in depth review. A thorough review about foundation. A thorough review about HIGH END brands foundation that you don't easily find in the world wide web yet you can easily make mistake when purchasing and wasted a significant amount of money. So to avoid that, enter Rae. She really understands the products and, instead of talks hyper in repetitive vocabulary, she significantly explains about the performance of the products. She also responds to comments regarding the products.


Many beauty gurus have their own strongest tool. And Julia's would be makeup tutorial. Julia is very talented. And she does a few creative makeup, which is not really my favorite, but her talent really shows up through those videos. Julia's makeup, in my opinion, is more on a bold and bright look. Like, smokey eyes with red lips. Usually I picked just one feature to recreate or do a more subtle version of her look whenever I need inspiration to do my makeup.


Out of so many gurus that I first subscribed to, Aubrey is the only one whose channel I still follow intently. For old time sake. Out of the five gurus I mentioned here, she's the one I can easily relate to. Her makeup are pretty basic, which makes her channel perfect for beginner. While other 'commercial' gurus have changed and become too conscious about how they pose or smile, Aubrey stays fun and comfortable to watch. I watch her channel to keep up with the latest makeup products and whenever I need inspiration in color combination. I have to say, she has problems with continuity. She's been MIA for long. But at least she has constantly uploaded videos for a couple of months lately.

So those are my favorites Youtube beauty gurus. I highly recommend you to check out their channel if you haven't already. And feel free to recommend me your favorites!

Picture of Pixiwoo is taken from here
picture of Rachel is taken from here
Picture of Wayne is taken from here
Picture of Julia is taken from here
Picture of Aubrey is taken from here

Nicole by OPI Kendall on the Katwalk


Nicole by OPI Kardashian Kolors is finally here. Yes, as annoying as the name of the collection is for Indonesians. I saw the collection at Matahari Department Store. Not sure how long it's been launched here. I just dropped by out of curiosity eventhough I didn't really have any idea how the collection would be like. I tried several shades and got home with Kendall on the Katwalk. Just because she's the most beautiful. The shade and the girl altogether. Oh that's right, gramma Kim, move over!

First, allow me to alert you that this is an all glittery polish. So if you are not really into it then maybe this one is not for you. Although, you might change your mind once you see the shade. The color is extremely gorgeous. It's a transparent blue polish packed with blue and green shimmers as base and noticeable purple glitter in a slightly larger size. The green and blue really mixed together creates a wonderful base for the purple glitter. Absolutely stunning. Once applied, my nails look super sparkly. Looks even better when a light hits. Love it so much! The color is so dense, I need just two coats to apply the polish evenly and covers my nails completely.


Having a glittery finish, it's no surprise that this polish has rough and gritty texture on the nails. Even after I applied top coat over it. Not that it affects the finish or whatever. Just a heads up that it's gonna feel annoying when you touch your finger. When it comes to removing it, of course it's gonna be a pain in the back. But to me, I think the color worth all the hassle. I mean, lookie!


If you're interested, Nicole by OPI is available at IDR 130k.

Monday, February 20, 2012

FOTD: Glitter Gold Line

Hi guys!


Have you checked out latest fimela article? Apparently I was featured in their article because, listen to this cause it's the best part, they love my look! Woo hoo! High five! *Barney Stinson style* Okay, it was just one small article about 8 favorite looks on different latest Beauty Events. But hey, I made it to the list together with Maudy Koesnaedi so I'm allow to act all hyper about it!

Obviously this is my FOTD for the last blogger event that I attended, which is Launching of Revlon Lip Butter. I decided not to really focus on my FOTD on that last article because it was mostly about the event. But now that the look was featured, I decided to post about it. It's actually just another natural look, the way I usually do my makeup. You know me, I play safe. I added the glitter gold liner on the last minute, just before I stepped out of the door. The glitter liner looked very subtle, I didn't think anyone would notice it. Apparently I was wrong.


So these are the products I used for the look.
Face
Graftobian HD Creme Foundation 'Desert Sand'
Make Up Forever HD Powder
Bobbi Brown Corrector 'Peach'
MUFE Lift Concealer '3'
LORAC Couture blush

Eyes
Urban Decay Primer Potion 'Eden'
Too Faced eyeshadow 'Pink Cheeks'
Urban Decay NAKED Palette 'Virgin', 'Sin', 'Darkhorse' and 'Smog'
My eyebrows set
MUFE Aqua Eyes'1L'
Bourjois Liner Clubbing 'Absolute Black'
NYX Liquid Crystal Liner 'Crystal Champagne'
L'oreal Volume Shocking Mascara

Lips
Revlon Natural Wonder Lipstick 'Spice'

and here's the article.

picture courtesy of fimela


I didn't even read the article until my high school friend told me about it on Facebook. LoL! Other bloggers in the article were Mada from cantiktanpabangkrut.blogspot.com and Mbak Woro from thepradonos.com.

Sunday, February 19, 2012

Tips Menulis Review Kosmetik

Hi Bloggers.

Tips kali ini adalah mengenai menulis ulasan produk atau, bahasa populernya, Review. Bisa dibilang Review produk adalah artikel favorit saya. Secara saya ini orangnya rempong kalo kepengen sesuatu, terutama karena saya lebih sering belanja kosmetik online. Jadi kalau sedang mengincar suatu barang, saya selalu cari review mengenai produk tersebut sebanyak-banyaknya dari berbagai macam blog. Apalagi kalau produknya termasuk mahal untuk kantong saya. Ga mau dong beli kucing dalam karung? Semakin banyak yang diulas, semakin banyak sudut pandang mengenai produk tersebut, semakin saya puas. Yang kemudian berimbas ke hobi saya menulis review produk.
Kalau kamu mengikuti blog ini, kamu mungkin memperhatikan review saya yang seringnya panjang lebar ngalor ngidul ga keruan, sepertinya semua mau saya jabarin di postingan. Kurang lebih postingan saya menggambarkan betapa ribetnya saya kalau mencari informasi mengenai produk tertentu. Tapi pada intinya sih saya yakin, saya ga sendirian. Pasti ada aja orang yang ingin informasi sebanyak mungkin sebelum memutuskan membeli sesuatu. Saat saya menulis review, tujuan saya adalah memuaskan mereka! Tentunya saya bukannya mau bilang kalau menulis review mesti panjang lebar, tapi tujuan utamanya adalah memberi informasi yang cukup.
Nah, berikut ini adalah hal-hal yang perlu diperhatikan dalam menulis review kosmetik, a la saya.
  1. Kenali produk yang direview
Secara logika, ya kalau menulis review pastinya kita harus tau produknya. Dan yang dimaksud tau produknya bukan sekedar beli, buka segelnya, lihat isinya dan colek-colek. Kalau baru segitu perkenalan kita dengan produknya, belum cukup untuk menulis review. Ada juga blogger yang langsung menulis mengenai produk yang langsung dibeli. Tapi kalau memang bloggernya mengerti yang namanya review produk, biasanya postingan tersebut akan dijuduli first impression (kesan pertama), bukan review. Percaya deh, ga ada untungnya bagi pembaca kalau dalam artikel review, kamu menggambarkan betapa nyamannya suatu foundation saat dioleskan di tangan kamu.
Sebaiknya sebelum memutuskan untuk menulis review, coba dulu produknya beberapa minggu bahkan bulan. Jadi kita sudah kenal baik dengan produknya dan tau mendalam apa saja kelebihan dan kekurangan yang bisa diinformasikan ke pembaca. Selain itu kita juga bisa menambahkan pengalaman kita saat menggunakan produk tersebut. Jadi pembaca bisa melihat kalau kita memang menggunakan dan mengerti tentang produk yang kita tulis.
  1. Lebih baik kebanyakan daripada kurang
Yang namanya tulisan, kalau dianalogikan dengan tubuh manusia yang harus ada kepala, badan dan kaki, tulisan pun ada yang namanya pembukaan, isi dan kesimpulan. Yes, ini semua diajarin di pelajaran bahasa Indonesia dari jaman SD sampe SMA, jadi ini basic banget. Walaupun blog isinya artikel tidak resmi, tetep aja tulisan yang terstruktur rasanya lebih enak dibaca. Biasanya dalam ‘pembukaan’ saya menulis mengenai deskripsi prduk secara umum (biasanya berdasarkan keterangan website) atau bisa juga alasan saya membeli produk tersebut. Di bagian isi, baru saya mengulas mendalam mengenai produknya. Misalnya kemasan, isi, warna, tekstur, ketahanan deesbre deesbre. Lalu pada kesimpulannya, kenapa saya suka atau tidak suka produknya dan apakah saya merekomendasikan produk tersebut.
Seringnya ada blog yang menambahkan poin-poin pro/kontra di reviewnya. Yang menurut saya bagus banget. Tapi inget kalau poin-poin ini letaknya di kesimpulan. Ga afdol ah, kalau artikel review isinya hanya poin-poin pro/kontra. Pastinya pembaca kan ingin tau dasar dari kesimpulan kamu. Takut postingannya kepanjangan? At least, kalau postingannya kepanjangan, pembaca bisa memilah sendiri mana yang mau dibaca. Tapi kalau artikelnya pendek banget karena kekurangan informasi, pembaca mau cari informasi kemana?
  1. Swatch
Nah ini elemen yang ga kalah penting saat menulis review, bahkan cenderung krusial. Jadi poin plus banget kalau kita bisa menggambarkan seperti apa sih bentuk produk yang kita review ini, sedekat mungkin dengan aslinya. Caranya selain dengan kata-kata, ya pastinya dengan gambar. Balik lagi, seperti yang saya pernah bilang, kenali kamera kamu! Jangan lupa bahwa setting kamera dan pencahayaan matahari itu megang peranan banget.
Gambar diatas bukan hasil saya mainan photoshop. Dua-duanya adalah barang yang sama, diambil di jam yang sama, dengan kamera yang sama, dengan setting warna yang berbeda. Yang mana warna yang benar? Ya tentunya kita sebagai yang punya yang tau. Nah, saat mengambil gambar, jangan lupa dilihat dulu, gambar yang kita ambil sudah mirip aslinya belum?
Dan ngomong-ngomong tentang Photoshop, sekedar memberi opini, buat saya Photoshop itu bukan dosa. Kalau memang dengan diedit hasilnya bisa mirip dengan warna aslinya, kenapa tidak? Tapi ini preferensi pribadi sih.
  1. Tempatkan diri sebagai pembaca
Pada akhirnya, yang paling penting dalam menulis review adalah, menempatkan diri kamu sebagai pembaca. Terutama pembaca yang sama sekali tidak tahu mengenai produk yang kamu review. Lalu tanya pada diri sendiri, apakah tulisan kamu sudah memberi penjelasan yang cukup? Kalau kamu adalah pembaca artikelmu sendiri, apa tulisan kamu sudah memuaskan?
Saya yakin semua yang menulis blog, pasti mulai sebagai pembaca blog. Coba inget-inget lagi, apa yang ada di pikiran kamu saat membaca postingan orang lain? Pasti pernah merasa tidak puas karena postingan yang kamu baca kurang ini, kurang itu. Nah! Mumpung sekarang kamu menulis artikel kamu sendiri, saatnya memasukan poin-poin yang kamu rasa kurang di postingan orang lain untuk melengkapi postingan kamu sendiri.
Saat ini sih baru segitu tips yang kepikiran. Semoga artikel ini bisa membantu kalau kamu masih clueless saat mau menulis review. Kalau mau nambahin, boleh lho tinggalin komen. Happy blogging!

Friday, February 17, 2012

Launching of Revlon Lip Butter (Picture Heavy!!)


The latest most awaited product from Revlon is finally here. Yes, ladies and gentlemen, if you think it’s Colorburst Lip Butter, it is! And to celebrate the launching of the product, Revlon Indonesia together with Cosmopolitan Magazine threw an event for Beauty and Fashion Bloggers. The event was held last Thursday at Poste Kitchen and Bar, Kuningan. In conjunction with the colorful Lip Butter and yummy mouth-watering names of the shade, the dress code for the night was 'Candylicious'. I was excited about the event since it's been so long since the last blogger event and I missed hanging out with my blogger buddies.


Above was my FOTD for the event. I took the picture while I was in parking lot, waiting for Stella (stellalee.net). We decided to go together since we had to cross 3in1 area to reach the venue. So after god-knows-how-many-hours we were sailing through Jakarta's infamous traffic jam, we finally arrived ON TIME! At Poste there were Priscilla (priscillaclara.com), Anisa (nisachan-nisachan.blogspot.com) and mbak Dessy (livingdaisy.blogspot.com) arrived early. I was so happy to meet them again. Some of the bloggers who I met for the first time that night were Carryn (carrynapratiwi.blogspot.com) and Catra (shinelikeastarr-beauty.blogspot.com). Even Mada (cantiktanpabangkrut.blogspot.com), beauty blogger from Bandung, showed up that night! Other bloggers I met were Putri (putrikansil.blogspot.com) and Leni (cominica.net) though we didn't get to chat too much. There were so many beauty bloggers whose face are familiar through blogosphere, I was overwhelmed. It is always fun to meet new blogger friends!

Meanwhile, the venue was decorated according to the theme. It was like stepping into a Candyland! The decoration was so cute filled with lollipops.


Looked like Revlon made sure that the venue didn't just look cute, but also sweet and sugary enough. How could it not be? There were lollipops and cupcakes! By the way, do you think my outfit was Candylicious enough? Well, when they said 'candy' I immediately thought colors. So yeah, I didn't even know what kind of candy I was.. but maybe caramel candy? Oh well..

The dinner was served. And while we were enjoying dinner, we were introduced to the product that was launched that night, Colorburst Lip Butter. The idea behind the product is a mixture between lipstick and lipbalm. Enriched with mango butter, shea butter and coconut butter to boost the moisturizing effect. There are 20 colors available and we were offered to try whichever we liked. So I changed my lip color.


And that night, us bloggers were wearing Lip Butter on our lips. I didn't get to snap pictures of everybody. But here's some.

Nisa wearing Sweet Tart. Me wearing Tutti Frutti.

I tried Tutti Frutti at the counter before the event and fell in love instantly. I have really been into coral lately and this Tutti Frutti fits the category. I was thinking about purchasing it but decided to postpone at least until after the launching.

The event was hosted by Iwet Ramadhan and Ari Kirana. And to start the event, Santi Turino, Brand Manager of Revlon Indonesia, gave an opening speech and introduced us to Lip Butter with the beautiful Emma Stone as the face of the product. Because Revlon Indonesia hits the highest selling rate in South East Asia, it was arranged that the launching of Lip Butter is not so far behind the launching in USA so Indonesian customers can try the product immediately. And this is the first launching of Revlon Colorburst Lip Butter in South East Asia region. We also watched behind the scene of Revlon Lip Butter commercial, starring Emma Stone.


Next was a talk show about latest fashion trend with Dewi Utari (dewiutari.blogspot.com), Fashion Editor of Harper's Bazaar Indonesia, together with Nina Nikicio (nikicio.com), CEO of the Fashion label Nikicio. And of course since it was an event for fashion and beauty bloggers, it wouldn't be complete without makeup talk. Makeup talk that evening was with makeup artist Hendro Revco and the beautiful Revlon Local Brand Ambassador, Carissa Putri.


Makeup artist for Carissa Putri and Ary Kirana for the evening was Hendro Revco. Carissa Putri looked absolutely stunning. Of course she was wearing Lip Butter and her shade was Cupcake. Carissa said she prefers soft makeup and the lip color really completed the whole look. For the eyes, instead of black, she opted for teal color from CustomEyes palette in Party Pops to line her lower lashline.

Hendro Revco gave out some tips about Lip Butter. He mentioned that Lip Butter is unique in a way that the colors appear differently on different people. So it is very important to try out the products directly on the lips instead of just sweeping it on the hand. Also, it is important to wear moisturizing lip products like Revlon Lip Butter. Not only it protects your lips from dryness, the products could also help remove dead skin on the surface of the lips along when you remove the lipstick.


After some games, door prize and all, the event finally came to an end. All the bloggers took pictures together but unfortunately I had to get home as soon as I can since it was getting late so I missed it. But I did take picture with the host that night, Ary Kirana, who of course wore Lip Butter. Hers was in shade Lollipop. I also managed to snap a picture with Carissa Putri.


Revlon did not let us go home empty handed. We received a goody bag filled with everything sweet. There were lollipops, cupcakes, cotton candy, and the sweetest of all, two Revlon Colorburst Lip Butters. Did I mention I postponed purchasing the color Tutti Frutti? Smart move! Because that's the shade I got, together with Sugar Plum.


By the way, because I worked with Revlon before to review their products, I was asked to do a small interview with O Channel to give my opinion about the event and the product. I was so excited yet nervous at the same time. I believe I just made a fool of myself although they said they will edit the scene first before airing it. So stay tune on O Channel this Sunday at 06.30pm if you wanna watch me embarrassed myself!

Courtesy of Revlon Indonesia. Watch the video here.

On the other hand, big thank you for Revlon Indonesia and Cosmopolitan Magazine for the invitation. It was fun and of course, we want more! ;)

Monday, February 13, 2012

Better Version of Your Lips For Valentine's Day

Hello Ladies.

So Valentine's Day is approaching. If you celebrate Valentine, I hope you already have someone to spend your Valentine with. Hopefully that 'someone' would be either a guy or a bunch of girlfriends or even six casts of FRIENDS along with a bag of potato chip would do (hint!). I was thinking about making a tutorial for your Valentine's date (or even for just hanging out with girlfriends). I thought something neutral would be nice and then I realized that most of my makeup are subtle neutral looks that would be perfect for your date. So feel free to click on FOTD label for a selection of makeup looks. I know most guys would prefer if their ladies look naturally beautiful on the date but what they didn't know is that it takes makeup to look natural! *wink*

I am truly sorry that I couldn't come up with a new makeup tutorial. I'm sure you are already familiar with my cliche excuse. Yes, I'm not even gonna say it. But don't worry because my friend Nisa got it all covered. Check out her Valentine makeup look here! My advice would be to go easy on your makeup. This time, you might wanna keep your bright blue eyeshadow or fuchsia lipstick in your makeup case for a while and go soft instead. In this post I give you my collection of MLBB lip products you can try for your date.

French Kiss has a subtle faint color the way glosses are and yet it still appears as pink. To me, since this is not too opaque, it's great for quick application.


L'Absolu Crème De Brillance is a kind of liquid lipstick. Number 363 is warm nude pink. But the shimmer makes it much more special and far from blah-looking.


Syrup has lustre finish which, in my opinion, the most comfortable finish for lipstick as this gives a moisturizing effect. It has a hint of purple and leans a bit more on cooler side. Bit still falls in natural color category.


Kinda Sexy has a hint of peach. It's a matte finish lipstick so it wouldn't be as easy to pull off as others. But this is my go to lipstick for most of the time. And works when paired with most of my glosses.


Lady's Choice is the one that matches my lip color the most. Almost as if I didn't wear anything on my lips but since it has a glossy finish, it appears like healthy version of my lips. Which is the main idea.


Of course people have their own definition of My Lips But Better. To me MLBB is a shade that covers my actual lip color evenly, brightens up my complexion in general, yet doesn't look like I have lipstick on. Here I tried to include brands that are available locally. But I just had to add Benefit Lady's Choice because as I said, it's my truly MLBB shade.

Anyway, I hope this post could help you decide on what makeup you'll be wearing on your Valentine's Day. And whatever your plan is, I hope everything goes well. Happy Valentine's Day!

Sunday, February 12, 2012

Tribute to a Diva. RIP Whitney Houston.


Hi guys. Let me take a time to write a post as a tribute to the Diva, Whitney Houston, who has just passed away as I wrote my last entry.

I'm a nineties girl so I can say that I grew up with Whitney (her and other incredible divas such as Celine and Mariah). Her songs filled my everyday and listening to her songs now brings back a lot of beautiful memories. Whitney has more than just a wonderful voice. Her songs get me everytime. She sings not with just her voice but with her heart. Her songs make me sing, make me dance, make me smile even cry. Listening to her makes me realized that music is more than just a batch of notes waiting to be sung. Music has a way to people's heart. It's magic.

I said before that I'm not a type of person who follows celebrity's personal life. But I knew about her trouble with her marriage and drugs. To me those didn't make her any less of a Star. Hey, everybody has problems in their life. It's not right, but it's okay. All these times she was on absence in music world, I believed she'll come back someday. So it came as a shock to me to hear the news that she has passed away. I'm writing this piece while listening to one of her songs, 'I Look To You'. It's hard not to shed a tear.


Rest in peace, Whitney Houston. Thank you for bringing your music into the world. You may have gone but you will continue to live on in everyone's hearts. Someday my (future) children will sing your songs. You are a legend. You will be missed. And the world will always love you.

WHITNEY HOUSTON
1963 - 2012


Picture courtesy of thegrapejuice.net

[Review] Real Techniques Stippling Brush


Guys, I have to share about this brush. It's too amazing, I can not keep it just for myself! So here it is, Real Techniques Stippling Brush. I received it on October, as you've probably seen in my haul entry, and this has been my only foundation brush since then.

I'm sure you're all already familiar with the brand. Real Techniques has been around long enough. It's a brand by Samantha Chapman, one of the two sisters who run Pixiwoo channel on Youtube. Back then, I was watching their videos with Sam and Nic using a bunch of colorful brushes and they kept mentioning the name, Real Techniques. I was interested and thinking about where can I get those brushes. Only to found out that it was Sam's own brush line. Sam and Nick are UK based make up artist but for US residents Real Techniques line is available in Ulta, which is where I ordered this brush (via online seller, of course). Real Techniques is a brand by Paris Presents Incorporated, a company that also produces Ecotools. So if you are familiar with Ecotools, you'll see that the two brands have the same quality as well as affordable price range. They also use eco-friendly materials to support the environment.

In general, Real Techniques brushes are divided into three sections, which are Base brushes, Eye brushes and Finishing brushes that are color coded into Gold for base, Blue for eyes and Purple for finishing. Stippling brush has a purple handle but for me it's more of an all over brush that can be used for base to finishing. I use this mostly for my foundation. On the handle, there's a brand written and, instead of number, the name of the brush. At the base is a flat black rubber so the brush can stand on a flat surface. Which I don't think is necessary but not a bad idea. One time I already pumped my foundation into the brush and realized I forgot to put my primer so I just let the brush stand on the table while I applied my primer. Yeah, just when you thought the flat base would be unnecessary.


The bristles are made out of cruelty-free taklon bristles which I much prefer for foundation brush rather than natural bristles. It's densely packed, the way flat top brush usually is and it has a perfect length so it doesn't tilt when stippled on my face and applied products exactly where I wanted it to be. The solid pixelated tip also delivers more even finish. The diameter is not as huge as, say MAC 187, but it still applies foundation in no time. Thanks to the dense bristles that helps 'push' products around. Below is a picture comparison of Real Techniques stippling brush to other stippling brush (MAC 187 SE). As you can see, MAC's bristles are way longer than Real Techniques' that way, it easily tilts on application (unless you bounce it really really lightly on your face, but I don't do that especially when I'm in a hurry) so products tend to get everywhere outside the area I was meant to cover.

Click for larger image

I use this brush mostly for foundation, cream and liquid. Since it's dense enough, I can wear this to apply even a watery foundation. I use this with swirling motion and if the finishing looks streaky, I can just stipple this brush and the foundations will look smooth. Sam claims that this brush can also be used for powder application, whether it's foundation or blush. Thank God for the tiny diameter, I can use this to apply cream blush without the final result covering my whole apple cheeks and a bit outside that area. Multi-purpose indeed!

After months of applications I don't experience any shedding while using this brush. And the shape stays the same after washing it time after time. I know MAC also made one brush like this. I've been looking for MAC 130 myself. But it's a limited edition and, not to mention, pricey. Now that I have Real Techniques stippling brush, I'm just gonna stick with this one.


So far I couldn't think of any flaw from this brush. Like any other brands, of course there are hits and miss products. And I think this brush deserve to be a hit from Real Techniques. If you're interested, Real Techniques Stippling Brush is available for $9.99 at Ulta but I don't remember hom much I purchased it in IDR. Different online stores might give you different price, but it still falls in affordable category.