Sunday, January 29, 2012

[Review] Make Up Forever La Boheme Palette


La Boheme Palette is Make Up Forever's first baked eyeshadow palette. According to the website,
Six new limited-edition shades in extremely pearly springtime pastel tones. The baked powder technology ensures fine, intense color particles for eyeshadows with 50% pearly particles and a paraben-free formula. Incredibly fresh and luminous makeup and intense, Bohemian chic eyes. The eyeshadows of this palette glide on with fingertips or a brush for two different results: applied dry for a sheer, luminous and natural effect or wet for an intense look, filled with pearly particles.
The palette comes in a cardboard packaging with patchwork design and stitches all over. With a purple ribbon on the side, it opens up like a book and displays six eyeshadows in convex form, placed side by side. I'm not really excited with the placing of these eyeshadows. It creates super messy sparkle between each other after application.

This is my very first time trying out baked eyeshadow. Baked eyeshadow is promoted as eyeshadow that needs to be applied wet for vibrant finish. While dry application gives you subtle and sheer finish. All these times the word 'sheer' holds me from purchasing baked eyeshadow. And yet, out of curiosity, I decided to give this palette a try.


Six eyeshadows in this palette are Green Lagoon, Vegetal Green, Beige, Parma Purple, Brown and Coral. Natural Green and Beige have pearly finish while the others have sparkly finish.

Dry application.
Apparently, when applied dry, these eyeshadows are not super sheer like I thought it was going to be. In general they deliver great pigmentation in subtle colors. The shimmer and sparkle don't really show up which makes it appropriate for day time look. However keep in mind that eyeshadow with sparkly to glittery finish are really prone to fall out, especially when applied dry. Green Lagoon is the only color that applies sheer even on top of primer. Brown is a bit chalky when applied on it's own as you can see in the picture below, but a layer of primer underneath it could totally fix the problem.

Wet application.
Considering baked eyeshadows are meant to be applied wet, obviously these eyeshadows give the best performance when applied wet. The colors are more vibrant and they have sort of a metallic touch to it. Wet application really emphasizes the undertone and the shimmer and sparkle in these eyeshadows. Which makes some of these even prettier and other are even scarier, depends on whether or not you like glittery eyeshadows (Eventhough it describes as sparkly, Parma Purple and Coral look more glittery rather than sparkly). Wet application also decrease the chance of having glitter fall out since it automatically turns into a creamy consistency. It sticks better to the base and applied effortlessly. Lagoon Green shows its true color when applied wet. It has a beautiful greenish gold shimmer which makes it unique. I didn't understand why they named a turquoise eyeshadow as green, but I can totally see it once it applied wet.

You can either wet your brush and then dip the brush to the eyeshadow or pick up the eyeshadow with dry brush and then wet it either by spraying it using setting spray like MUFE Mist & Fix or carefully dip to water (just a bit!!!!!). I recommend the latter because that way you get the eyeshadow soaked evenly and saves you from chalky application. I currently don't have any setting spray so I just touched the surface of the eyeshadow-covered of the brush on a wet tissue. (Not the best option, definitely thinking about purchasing Mist & Fix)

Click for larger image

I swatched these eyeshadows in three different form. On it's own, on primer (Urban Decay Primer Potion 'Eden') and wet. Most of the colors show up as pigmented on it's own except for Lagoon Green. But of course I always recommend applying eye primer as a base. And as you can see Lagoon Green looks much better when applied on top of a primer. While dry application is enough to make these eyeshadows stand out, wet application delivers more vibrant pigmentation and enhances the sparkle and shimmer of the eyeshadows.

As for the color combination. There are two colors that can work as highlight, which is Beige and Coral. And only one color that works as definition color, which is Brown. Beige and Coral look pretty as highlight. But constantly pairing all the shadows just with Brown could end up in boredom. But, back to the main inspiration of the collection. Bohemian is about living freely without following the conventional rules. So go ahead and be creative with this palette (which is more like an invitation for myself).

In the end, I'd recommend this palette. If you like or you wanna try baked eyeshadow. If you like or don't mind glittery eyeshadow. This palette doesn't disappoint.

I hope you find this review helpful for you. Especially if you are thinking about purchasing the palette, hope this review could be a reference. I tried to post this review as soon as I can considering this is a limited edition. If you're interested, Make Up Forever La Boheme Palette is available at IDR 525k.

Make Up Forever Spring 2012 La Boheme Collection and a Fun Makeover


In case you haven't heard, Make Up Forever has launched their Spring 2012 Collection called La Boheme. According to the website, La Boheme collection is inspired by bohemian spirit with carefree attitude. They play a lot with floral motifs, ethnic and gypsy influences, handmade embroidery, patchwork and prints.

This collection consists of
  • La Boheme eyeshadow palette

  • Aqua Eyes in 'Gypsy' (matte black brown)

  • Rouge Artist Natural in 'Folk' (red coral) and 'Boheme' (peach beige)


I was invited to the pre-launch of the collection but I'm sorry I wasn't able to attend the event. Therefore, I could not report it on my blog. I decided to visit the counter myself to check on the collection. As you can see this collection captures the Bohemian style mostly in the packaging. The Aqua Eyes and Rouge Artist have flowers prints on the packaging. While the eyeshadow palette is decorated with patchwork design.

When I arrived at Make Up Forever counter in Pondok Indah Mall, apparently they are currently in the spirit of introducing the new collection. I saw many ladies are sitting in front of the mirror, having a makeover. Of course I didn't want to miss it! The sales lady who helped me that day was Dian. She was so so so nice. I went to the counter wearing only foundation and mascara and I left the counter with full makeup on, including the latest La Boheme collection.

Products used.
Face
Channel Mat Lumiere Foundation
MUFE Velvet Finish Compact Powder. Not sure which shade
MUFE HD Concealer to conceal those nasty acne scars.
MUFE Sculpting Blush no.4
MUFE Sculpting Kit no.2

Eyes
MUFE Eye Prime
MUFE La Boheme Palette
  • Lagoon Green
  • Vegetal Green
  • Brown
  • Beige
MUFE Kohl Pencil. Don't know the number but I'm sure it was black with gold shimmer. The pencil used as a base for Brown eyeshadow.
MUFE Aqua Eyes Gypsy
MUFE Smoky Lash Mascara
MUFE Eyebrow Pencil in Blond. And then she layered it with the contour part of Sculpting Kit no.2

Lips
MUFE Lip Line Perfector
MUFE Rouge Artist in 'Folk'
MUFE Lab Shine in 6S


All MUFE products were applied during makeover. I just couldn't believe how generous Dian was. Especially because she didn't even know that I was going to purchase the palette. But she patiently did her job as a sales assistant, explained all the product and answered all of my questions. She definitely deserves a shout out! I wanted to try the blue and green ones but as you can probably see the color didn't really show up on my eyes. Before makeover, Dian asked me what color that I want to try. I told her I want the blue one but kind of afraid that the color will look too bright on me. Looked like that kinda made her hesitate to put colors on my eyes. LOL! She just patted the blue color very lightly on my lid so the color appeared super sheer. But then I told her to make it smokey that's when she put the black kohl pencil and Brown eyeshadow on top of it. In the end, I decided to purchase the palette.

I was thinking about writing the review of La Boheme palette at once in this entry. I tried but the entry got too long. So don't forget to check out the review of the palette in next blog post! ;)

Sunday, January 15, 2012

Tips on Wearing Pixie Epoxy


No no no.. This is not a review. I don't need to review Pixie Epoxy, this baby sells itself.

Never heard about it? Let's start with an introduction. Let's just say, if you haven't tried any Fyrinnae products, my very first advice would be to visit this link and start browsing. Pixie Epoxy is Fyrinnae's idea of eyeshadow 'glue'. It is made to be worn underneath your eye makeup and hold the sparkliest, glitteriest (okay, those are not really words) eyeshadows you have. Just like another glitter glue, huh? Well, Pixie Epoxy also gives you the 'wet look' eye makeup without having to wet your brush or your eyeshadow. Still not convincing enough? How about a picture?

My point, exactly.

It comes in a tube with doe foot applicator. It literally looks like a white glue from outside. But once you apply this and blend it on your lid, it turns transparent. For $7 you get 10ml of products which doesn't seem like a lot but since you need just a small amount for each application, this one tube will last long enough.


This entry is just to give some tips on applying Pixie Epoxy. All based on my own experience. And here they are:
  1. Not a primer. Fyrinnae website specifically mention that this product is not a primer or base. It is recommended to put a primer first before applying Pixie Epoxy. However, I sometimes skip eye primer when wearing this and I don't have problems with my eye makeup fading at the end of the day. Then again, it's a trial and error thing.
  2. Pat pat pat away... Pixie Epoxy (Can I just call it PE from now on, only in this post?) has a sticky consistency (hence, this is an eyeshadow glue) so sweeping your brush wouldn't give you the smoothest result. I like patting my brush on top of this. Works a lot better. After you applied this, wait for it to dry a bit (it will still feel sticky) then pat your eyeshadow. I once applied my eyeshadow while PE was still wet and I had my eyeshadow sank into my eye fold.
  3. Doesn't need to be everywhere. Working with sticky base could be tricky. Sometimes it holds you from blending your eyeshadow. The thing with PE is that you need just a little bit of it. I usually put this on areas that don't require a lot of blending, and that would be my lid and my brow bone area. Inner corner would work as well. I don't like applying this on my crease as I need to blend a lot in that area. Then again, I don't wear glitter on my crease.
  4. Not suitable for matte. Just no. As if you didn't have enough problems with matte already. Applying PE underneath your mattes will make it super sticky to the base so you'll be having a hard time blending and the eyeshadow will look cakey. I learned it the hard way.
  5. If you didn't have this already, you need this!

Saturday, January 14, 2012

Current Eyebrows Routine

Hi guys! This is going to be about my current eyebrows routine. Thought I'll share it with you all.

First of all, let me stress out the importance of shaping your eyebrows! Even if you don't wear a lot of makeup or not interested at all, please take time to shape of your brows. Or maybe trim it, at least. I'm not gonna talk about how eyebrows could change how your face shape looks like, because most of time it's not a very convincing reason and not everybody cares about it. My reason is, well groomed eyebrows gives you a neat appearance. That's all. Who would want to carry around a bunch of bushes above of their eyes? I used to neglect my eyebrows as well. But since I was introduced to threading, that's when the addiction started. I love neat shaped eyebrows and I can't help staring at people's eyebrows first, especially girls with makeup on.

My natural eyebrows shape. Mostly straight.

Eyebrows is one of my makeup basic. Whenever I'm in a hurry, I'd gladly ditch my eyeshadows, eyeliner and even lipstick. But I'll do my foundation, eyebrows and a pinch of blush. My eyebrows routine includes threading, obviously. Waxing is my second option and I almost never shave it. My favorite threading place is Narsih, which is a famous affordable waxing and threading salon in South Jakarta. I love the place because it always gives the best result but I hate that the place is super crowded and I have to queue about thirty minutes almost everytime I visit the place. Anyone know other place to thread eyebrows, please let me know. When I moved for a year to Semarang, I learned to thread my own eyebrows from youtube. I still have professional do my brows but being able to thread my own brows helps A LOT in so many emergency situations. Shape wise, I prefer high-arched eyebrows shape which has nothing to do with my face shape (although it is the right shape for my round face), I just want more space to apply highlight on my browbone. Haha!

I didn't immediately do my makeup routine after my first threading experience. Back then, I thought, having shaped eyebrows means I didn't have to do my brows anymore. Boy how wrong was I?! I didn't realize how washed out my brows looked like back then. I even almost didn't fill my brows when I did my own makeup on my graduation. Thank God my mom told me to! Otherwise I'll have a no-brows look in my graduation pictures.

When I first started to do my brows, I used just eyebrow pencil. I raved about Viva eyebrow pencil before. But the more I was introduced to other products, the more options I had. So now I already picked my favorite products for my routine. And here they are.

Mac 'Cork' satin eyeshadow
Revlon Eyebrow Pencil in Dark Brown
Revlon slanted brush. This is actually not for sale. I got this as GWP. But any slanted brush will do. My point is, it doesn't have to be an expensive brush!
MUFE Khol Pencil in 2K, which is optional.

I prefer MAC Cork and Revlon eyebrow pencil because the color is more neutral and doesn't look too brown when applied. I don't even know how to describe the color on my brows. Not brown, not taupe, definitely not grey! Just enhancing my brows!

Here's the step by step.
  1. This is my bare eyebrows. I prefer to do my eyebrows after I apply my foundation.
  2. Using slanted brush, I fill the beginning of my brows, all the way to the tip of my arch with MAC Cork eyeshadow. I don't fill the tail of my brows with eyeshadows because the tail is too thin.
  3. Using Revlon eyebrow pencil, I line the lower part of my eyebrows. It helps a lot if the pencil was sharp. I start from the beginning all the way to the tail. This is where I determine how long my eyebrow tail should be.
  4. To shape the arch, I use my brush with eyeshadow left on the bristle to blend the eyeshadow on my arch all the way to the tail. (see the difference in pictures no.3 and no.4). Basically, on daily basis or if you're in a hurry, you can stop at this step. But if you want more definition, continue to the next step.
  5. Frame the brows with white eyeliner. I use MUFE Khol Pencil in 2K. And then blend the liner, heading out from your brows. Don't blend into the brows otherwise you'll ruined the color you've applied earlier. This step is to give highlight to your eyebrows.
  6. Done!


So that's my current eyebrows routine. I know it seems like a lot and takes a lot of time. But I love the result and I don't always do the whole steps, anyway. Hope this helps.

NOTW+ OPI Nicki Minaj Haul

It's weekend again, means I can do my nails again! This time I do another pattern of marbling. This is inspired by Collete's design from mysimplelittlepleasures. Her tutorial is mostly marble nails. Perfect if you wanna start to do marble nails. She's so talented!

For this marble nails, I used green, yellow and gold. I don't remember the name of the green nail polish. I'll get back at you on that. The yellow one is OPI 'Need Sunglasses?' and the gold one is China Glaze 'Jingle Bells'. For the base, I put Revlon 'White on White' nail polish. Honestly I don't really like this combination as the colors are not too contrast so it doesn't look as colorful as marble nails usually do.

Anyway I learned another point in doing marble nails while I did this nails. Apparently, the temperature of the room is super important! I did this while I was in my room with my air conditioner on. I kept having trouble that the polishes dried very fast on water so I didn't have enough time to run my toothpick over it. And it took me 2 hours until I realized that! What de heck!? After hours, I finally dipped my finger into the water and found out that it was already cold, not in a room temperature anymore. Argh! Lesson learned, the hard way. I think I'm having intoxication right now from hours of inhaling nail polish. *vomit face* I decided to apply glitter nail polish on my ring finger in the end, because I was already too tired of re-doing my nails *damn you, perfectionist soul!*


As you can seem the green and the yellow polishes don't really compliment each other and almost look just the same instead. But I'm glad that I got to do stripes marble nails! I'll try other colors next time.

And here's my latest nail polish purchase.


I've been wanting to get OPI Nicki Minaj collection. The colors in the mini version are so so pretty. I decided to buy the full size. 'Pink Friday' looks pretty when placed side to side with other colors from the collection but looked kinda blah when I tried it on my nails. I'm still on the fence about purchasing 'Pink Friday', somebody please talk me into or out of this.

The nail polishes tat I purchased are 'Fly' (teal), 'Did It on 'Em' (chartreuse green) and 'Save Me' (silver glitter). Can't wait to do marble nails with those!

How about you? Did you get anything from OPI Nicki Minaj collection?

Sunday, January 8, 2012

Possible Dupe for MAC Parisian Skies?

Hi guys! Remember MAC Bloggers Obsession Collection? The collection came out on May 2011 where MAC did a collaboration with 8 famous bloggers to create a line of eyeshadows and lipglasses. I purchased two products from that collection. They are Parisian Skies eyeshadow by Lesley Ellen from Lipstick Powder N Paint and Hocus Pocus eyeshadow by Lianne from The Makeup Girl.


Those two were the only products that caught my attention. I wasn't really into Hocus Pocus at first, but when I saw a closer swatch of this eyeshadow, I fell in love right away. Parisian Skies is also another beautiful color from this collection. It's an grey-ish blue with blue shimmer. So pretty! I thought it's an original color since I've never seen color like that before nor that I had any color like that in my collection.

Last month I visited Revlon counter and purchased Revlon Satin eyeshadow in Peacock Lustre. I didn't realize, but when I got home and browsing through my makeup, I looked at Parisian Skies and somehow I thought Parisian Skies and Peacock Lustre look quite similar in the pan. So I started to do comparison on both eyeshadows. Basically, these two have the same idea of color, which is greyish blue. And both are satin finish. Peacock Lustre has silver shimmer while Parisian Skies has blue shimmer which is why the blue tone is stronger.


Unfortunately, when swatched, these two are not exactly the same. Parisian Skies looks darker. So it's safe to say that these two are not 100% dupe of each other. Here's the swatch of both eyeshadows.


I think the way to describe it is, Peacock Lustre is a lighter version of Parisian Skies. However if you missed Bloggers Obsession and Parisian Skies eyeshadow, and you like the color, Peacock Lustre could be an alternative. I personally like this color. Still, I think it's unique color and even my warm skintone can pull it off. Would be great for smoky eyes as well. It's also a cheaper alternative. I own some Revlon single eyeshadows from their Matte, Perle and Satin eyeshadows, and so far I'm satisfied with the quality.

If you're interested, Revlon Satin Peacock Lustre and other Revlon single eyeshadows are available at Revlon counter and retails for IDR 40k for 2,4 grams of product. As comparison, MAC eyeshadow retails for IDR 220k for 1,5 grams of product.

Saturday, January 7, 2012

[Review] Sariayu Etnika Nusa Tenggara. Kelimutu Eyeshadow Trio.


New collection of the annual Sariayu Color Trend has finally came out! Sariayu Color Trend is one of the most anticipated annual collection from Indonesian brand. At least for me. I'm always curious about what are they going to come up with, every year. Color Trend 2012 is inspired by Nusa Tenggara, hence the name Etnika Nusa Tenggara. This year's collection consists of two theme, Bena Collection and Kelimutu Collection. I was already curious about Color Trend 2012 since Fashionesedaily tweet about it at the launching of the collection.

I went to Martha Tilaar counter, unfortunately the closest Martha Tilaar counter didn't have the complete collection yet. Not that I wanted to buy them all, but I wanted to see the whole new products. I specifically wanted Kelimutu eyeshadow trio (back then I didn't know the name, but I wanted the 'blue eyeshadow trio') and that's the only eyeshadow trio at the counter. The sales lady told me the other trio from Bena collection is an earthy tones colors trio, so I decided that I don't need that. I went home with just Kelimutu eyeshadow trio.

Based on the product description, this eyeshadow trio is enriched with Pomegranate extract and vitamin E. As well as UV protection.


Now if you’ve been following Sariayu Color Trend, then you must have realized that they changed the packaging of the eyeshadow trio since last year. Size wise, it is obviously bigger. Before you got 3,6 grams of products. Now, with the new packaging, you get 7,5 grams which is a bit more than twice the previous amount but the price doesn’t rise twice as much. I love the fact that the new packaging has a transparent exterior so you can see what’s inside. The old packaging has picture all over the packaging, so you can’t tell which is which, unless you read the name in the back of the packaging. The opening is also different. The old one opens vertically while the new one opens horizontally but that doesn’t really matter to me.


If you’re not from Indonesia and wondering about the name, Kelimutu, it’s a name of mountain and lake in East Nusa Tenggara. This eyeshadow trio is inspired by the lake. Lake Kelimutu is a three-colored lake that changes color in an unpredictable time (Google for more info). Sariayu translates the colors of the lake into their eyeshadow trio. Cool idea.

The trio comes with a dual-ended sponge and brush application that doesn’t even worth to mention. I tried it and I must say, even broom feels softer on my skin. So forget it. If you purchased this, throw the applicator right away.

As for the eyeshadows, I’d describe the colors as lime green, turquoise and navy blue. I love how the colors are color-coordinated so you can wear all three together in one look. Like always, Sariayu doesn’t come up with highlight color. If you see the advertorial, you’ll see most of the time they do couture makeup more than daily makeup so the placement of the eyeshadow is unusual. Of course you can just add your own highlight color.

The finish of these three eyeshadows is shimmery. While the green and turquoise can really be described as shimmery the way they look in the pan, the navy blue looks shimmery in the pan but the shimmer doesn’t really translate when applied. It looks like a matte blue with blue sparkles. Out of the three, the navy blue is the one that has a drier texture and a little bit chalky when swatched, but it applied just fine and pigmented enough for a definition color. The turquoise and the green have a smoother texture. As for pigmentation, the green one is a bit sheer although a touch of primer could help. The turquoise, in my opinion, is the most stand out color in this trio. It has great texture and very pigmented. Merak Kasmaran trio from Color Trend 2009 also has a turquoise eyeshadow in it. In my eyes, both turquoise from Merak Kasmaran and Kelimutu look exactly the same.


Overall, I’m glad that Sariayu has something bold yet wearable to offer from their collection. Usually the brand comes up with earthy tones color that, at one point, will get boring. Or they come up with colors, but they’re usually too pastel or lean toward cool undertone. The idea of this palette reminds me a lot of Merak Kasmaran, which also has bold color combination. And mind you, Merak Kasmaran was pretty booming when launched. So hopefully the same thing will happen with this trio. The quality doesn’t disappoint. Some of the minor problems I previously mentioned isn’t going to stop you from having fun with this trio. After all, with the price tag, I can’t complain much. I’m just disappointed with the fact that the turquoise in this trio is a repetition from previous collection (and also the fact that the turquoise color is included in Sariayu 25th Anniversary Palette, I think we’ve had enough).

Sariayu Kelimutu eyeshadow trio is available at IDR 42k. Sariayu Martha Tilaar is partnering with WWF so with every purchase of each Sariayu product, IDR 500 will be donated for Mount Mutis Nature Reserve, Nusa Tenggara. There you go, beautify yourself while doing good deeds.

And here's some looks that I created using this trio. I tried to create a winged eyeshadow look but I guess that failed. Haha..I need to learn more.


First Time Marble Nails

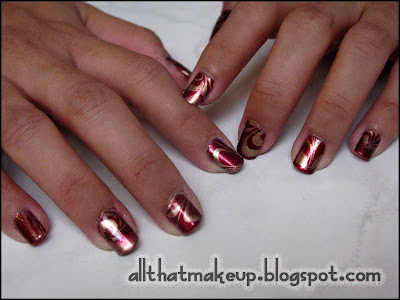
Finally tried to do marble nails. I've always wanted to try this but I didn't have any nail polishes before. As I said, I don't wear nail polish daily in hospital. So when I ran out of the last batch of my nail polishes, I didn't even bother to buy new polishes. Now I'm re-building my nail polish collection, so I have some that I can use for marbling. For this look, I use OPI Bogota Blackberry (berry red) and China Glaze Jingle Bells (gold). Out of all the polishes I currently own, I think these two colors are the only colors that go together. So here goes!


I must say, marbling is fun! I love mixing the colors, watching the colors spread on water and playing with toothpick, creating design! What I hate is applying the tape all over my nails. Geez! It's time consuming, troublesome and I keep sticking my fingers with another. But, as troublesome as it is, never ever forget to apply scotch tape surrounding your nails, otherwise here's a good example on what's gonna happen.

Messy nail polish on my skin. Gross!!!

Since this is my first time, I have so many things I have to get used to in marbling. Other than applying tape without sticking my fingers altogether, of course. I need to learn to work fast before the polishes dry and crack on the surface of the water. There are some pixelated dots that I picked up on my nails because I kept dipping my nails on area where the polishes are kinda dry and crack. That's another thing I need to work on too. I also need to work on making the design. As yo can see in this look, the design is super random. Many people I watched on youtube can make so many neat loops or stripes, I want that!

I didn't really plan on doing marble so I didn't really prepare for this. There are three layers of OPI It's My Year underneath this marble. I was wearing It's My Year, and after watching some videos on youtube I was, like, I wanna make marble nails! And I did it anyway without removing my previous polish. I don't think It's My Year have any impact on the finishing of my marble nails. But of course, another time I'll use a more proper base color.

Anyway, I just want to documented this look in this lovely Saturday afternoon. Because by Sunday night, I'll be removing all of these and go back to work. Ha!

PS. Yes, I have ugly nails. I bite my nails. And to make matter worse, I have really dry skin around my fingers. Don't pick on me, okay?!

OPI It's My Year. Review and Swatch.


OPI It's My Year is from Miss Universe Collection. I'd describe it as purple plum with loads of gold fine shimmer. This shade immediately caught my eyes when I was browsing around through some polishes at Sephora, while I was in Singapore. This is kind of an embarrassing story. Ehm, I stood there next to nail polish rack, really took my time applying this polish on all of my finger nails, in two coats. Yup. Well, in my defense, I did purchase this in the end so it's not like I was taking advantage of the testers. Ha!


I really love the texture. Shimmery polishes have never given me any trouble in application. It applies smoothly and evenly. And dries quite fast too. I didn't even use Seche Vite the first time I applied it. (Again, I applied this at Sephora. There was no tester of Seche Vite that I could take advantage of.) One layer is a bit sheer, but the shimmers could distract you from the sheerness. Two layers is enough. But I want the purple base to really show up so I usually apply this in three coats. The shimmer is so fine. I love how the gold shimmers give a three dimensional look to my nails.

Believe me those pictures don't do the judge. It's kinda hard to capture the shimmer with my camera. It's actually a lot prettier in real life as the shimmer is a lot more dominating.

While I wear it, I don't really experience chipping. But after three or four days, the polish kind of fades at the tip and I can see the tip of my finger nails. I assume it's normal for most polishes. But it's been so long since I wore polishes for days, so someone feel free to correct me here (It's frown upon to wear nail polish in the hospital so my fingers have been nail-polish-free most of the time for almost two years now). In case of removing it, of course it could be a tad difficult the way shimmery polishes usually are. I can easily remove the base color but the shimmer usually stay. And if I try to rub those shimmer with cotton, I end up with shimmer all around my fingers. But I don't care! I love this polish so so so much.

Tuesday, January 3, 2012

First Experience: Eyelash Perm

Out of curiosity, I decided to try Eyelash Perm, which is a process to permanently curl eyelashes.

First of all, let me explain to you my obsession towards eyelashes. To me, curling lashes and applying mascara are like two sides of a coin. If I didn't get to do one of those, might as well not do it at all. Unfortunately, more often than not, my only option is to left my lashes bare because I don't have enough time to curl my lashes. And that's pretty much what leads me to try eyelash perm. I did the process at Dandis Beauty Care at Taman Anggrek.


Basically the process is similar to hair perm, only in shorter time. The whole process takes about 45 minutes while I was lying down. First, to keep my lashes curled, the lady who did my lashes (I don't know what to call her. Anyone enlighten me, please?) roll my lashes and stick it to a white sticky rod. Like this picture below.

Excuse the weird eye. I wasn't allowed to open my eyes so I had to peek through to take this picture.

After that, she put the perming solution on my lashes using cotton pad and then I wait for fifteen minutes with cotton pad covering my eyes. The next step is to put neutral, again, all over my lashes. For the second step, I waited for ten minutes. I basically was just taking nap there.

By the way, while looking at my lashes, the lady told me that I have some broken eyelashes. She assumed it's from curling my lashes too harsh (Bingo!). Ugh! I didn't realized that. I'm a bit of a freak when curling my lashes, they have to be perfectly curled. I sometimes accidentally pull one or two strands of my lashes but I thought that was it and the rest was fine, apparently they're not. Gaahh!

Well, back to eyelash perm. After about 45 minutes, I was done. My lashes felt sticky after the process because of the rod. That explains why the lashes on my picture above looks messy. Different than hair perm, you're allowed to wet your hair immediately after the process.

The lady told me to put on mascara, which I carried with me, immediately after the whole process. She also told me to put eyelashes serum. She offered one from Dandis but it was too expensive. So on my way home I dropped by at L'oreal counter and purchased L'oreal Renewal Serum at IDR 149k. The sales lady also offered me their Double Extension Renewal Serum Inside mascara as an addition for the eyelash care but I didn't think I need anymore mascara at the moment so I skipped. I expect this serum will fix my breakage problem. The lady who did my perm told me if I took care my lashes intensively, I'd get to fix my problem. So I have my fingers crossed with this serum.


Here's the result, a day after the process.

This is my first time doing eyelash perm so I don't have any comparison. But I'm kinda disappointed with the result as it's not as curly as I expected. The process just gives me a little lift at the tip of my lashes but not really curled all the way to the root. Which is weird, because judging from the picture, looks like my lashes was already curled from the roots. Anyway, I'll still give it another chance though. I was advised to stay away from eyelash curler for a while until the curl went away. The perm will last for approximately one or two months and I'll probably come back at the third month. We'll see.

If you're interested in doing eyelash perm, the service is available at Dandis for IDR 200k.

Monday, January 2, 2012

I Can Say Stuff Too

Just sayin.

Sunday, January 1, 2012

FOTD: Kim Kardashian Inspired Makeup

I was browsing around my laptop and found this look I did a couple months back. It's the look that I submitted for looxperiments makeup challenge, which is Kim Kardashian Inspired makeup look. Here's the look that I use for my inspiration.


It's Kim's makeup, done by Troy Jensen. I think it's one of her remarkable looks, with her fuchsia lips using NARS Schiap lipstick. If you google, "Kim Kardashian fuchsia lips" then you'll find this picture on the very top. I, for one, don't have NARS Schiap or any products Kim uses for the look. *Troy Jensen uses mostly NARS for the look* So I just used whatever I have.

And here it is.


And here's the close up look of the eyes

For the smoky eyes, I only used Stila Smoky Eye Talking Palette. I wanted to copy Kim's super-long lashes. Unfortunately, my false lashes are long enough but not bold enough so it's unnoticeable in the picture. Oh well.. As for my lips, I used Revlon Colorburst lipstick in 'Fuchsia' and top it with Stila Lipglaze in 'Plum Fairy'.


That's all guys. Hope you enjoy.